How to Create a 4 Way Split Screen Video
Want to know how to create an epic four way split screen video that will leave your viewers hungry for more? Watch the video below or keep reading to learn how.
I think most of us have been drawn in at one point or another by one of those longer videos on Facebook or YouTube promising to show something like “6 Awesome Kitchen Hacks” or “4 Cupcakes That Look Like Your Favorite Game of Thrones Character”. They’re a great way to draw your viewers in and draw attention to more than one of your recipes.
But how do you create that amazing intro shot where you get to see them all on the screen at the same time? It’s not hard to do, all we need to do is play around with the scale and position of our videos in the effects panel.
To get started with my 4 way video I have opened up a new project in Premiere Pro, and I’ve named it after the video I’ll be making, which in this example is 4 Thanksgiving Side Dishes.
There are two ways we can go about creating a 4 way video. You could import four completed videos that you have already exported and encoded. I’m going to show you the second way, which is how to open up the existing projects from creating those videos so we can have the raw footage and ultimately a little more control over our finished product.
To do that you need to go up to File —> Open Project. Once you have all four of your projects open, you can double check that you have everything open you need by clicking on the double carrot menu in the right corner of the Project Panel. You should have five total projects open - four individual recipe video projects and your 4 way project.

Make sure you are in your 4 way project, then create a new sequence. You can do this by going to File —> New —> Sequence, or click on the little icon on the bottom right of the project panel and choose Sequence. Name your sequence the same as your project, in this case I’m using 4 Thanksgiving Side Dishes.
Next, go into each individual project, open the 16:9 sequence, select the entire sequence in the timeline, copy, and paste it over in your 4 way sequence. I’m choosing to include the video as well as the titles, but I won’t be using the music or logo at the end of each video, so I’m not selecting those as I copy and paste.
Now that we have all four videos in our 4 way sequence there isn’t a lot else we need to do with those unless you want to make changes to the titles or timing of the overall video.
If you know ahead of time that you’re going to be creating a 4 way video, it’s a good idea to use similar title graphics for the individual videos, and maybe shoot similar hero shots so they’ll look cohesive when put together in one video.
How to create a 4 way split screen in Premiere Pro
Take your playhead out past the end of your video in the timeline. Open up each of your original sequences again and choose the hero shot you’d like to use in the split screen. You could also copy and paste it from the 4 way sequence now that you have it in there.
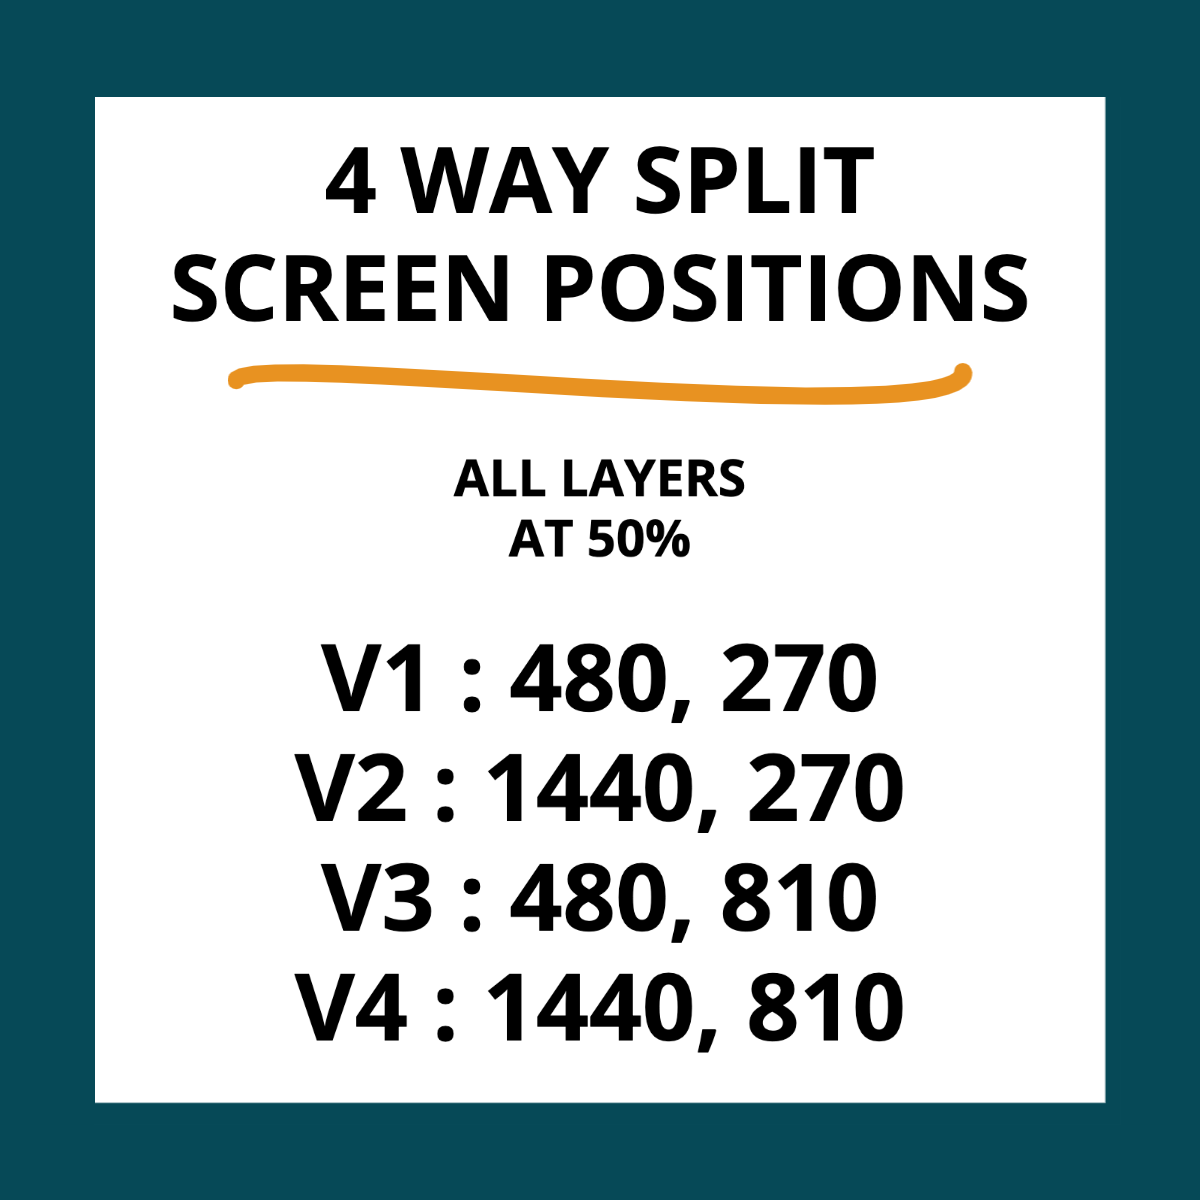
I like to put the first video that appears in the 4 way sequence on V1, the second on V2, and so on. Once we position them in the split screen they will read across, so the top left will be the first video, the top right the second, and so on.
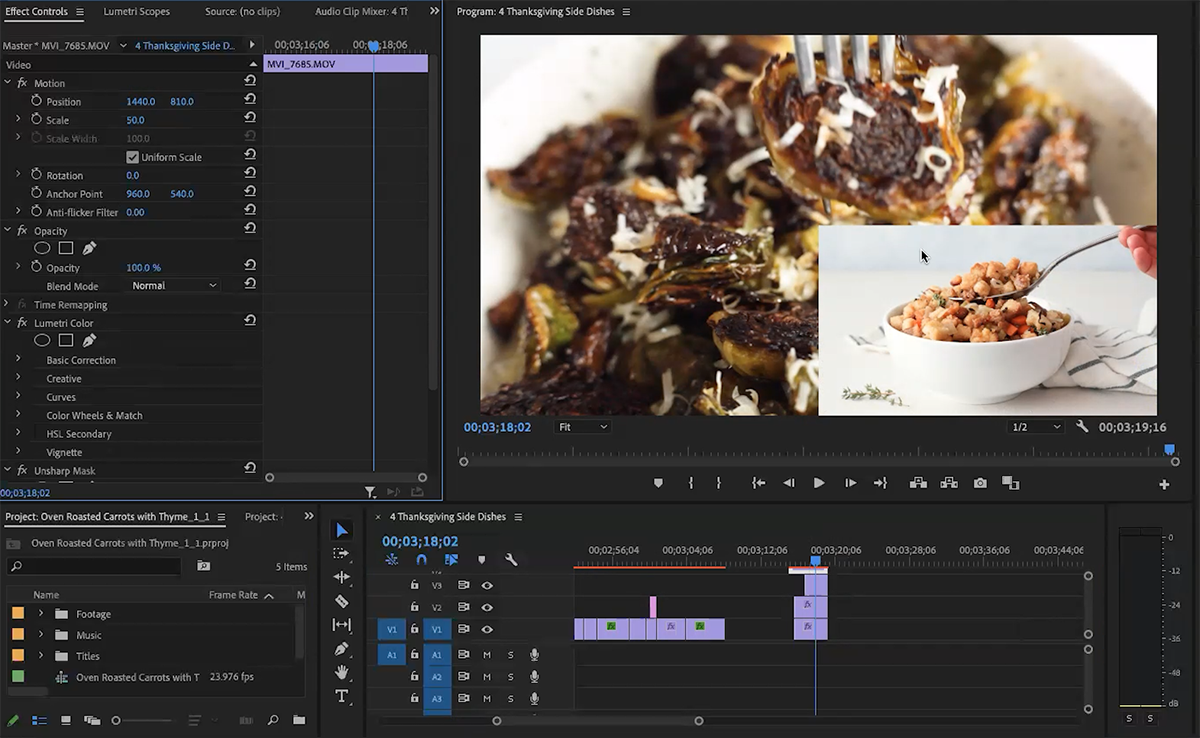
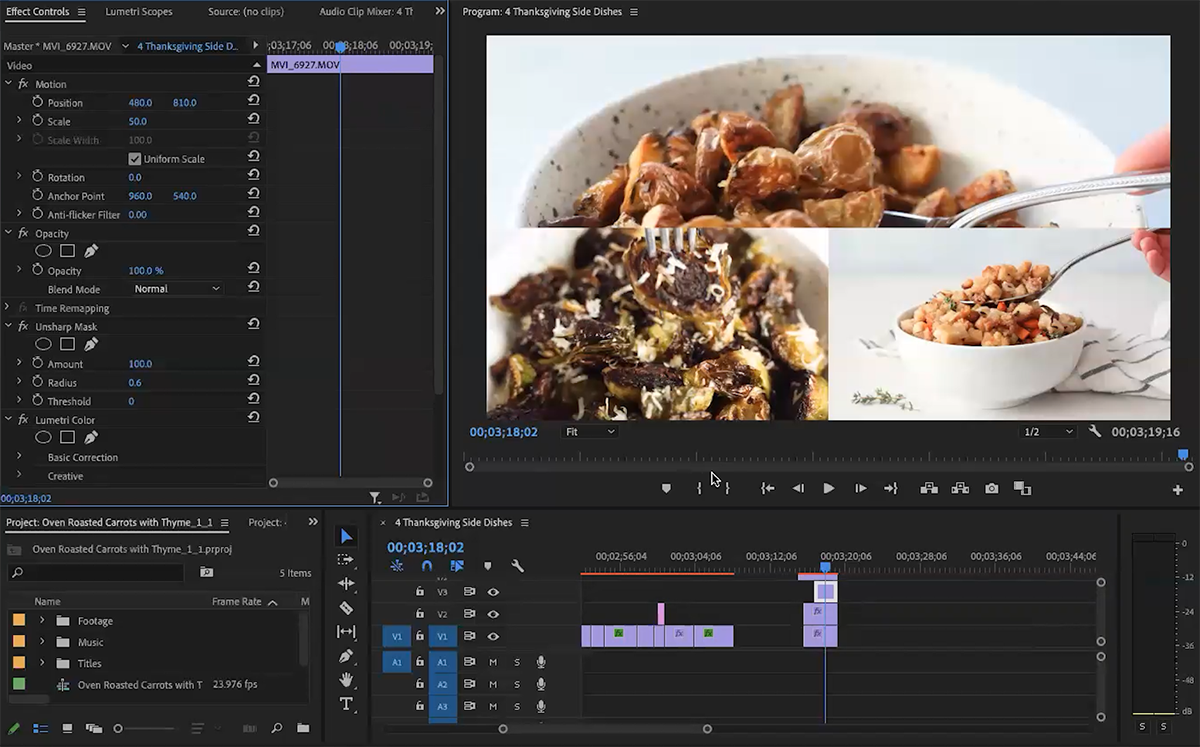
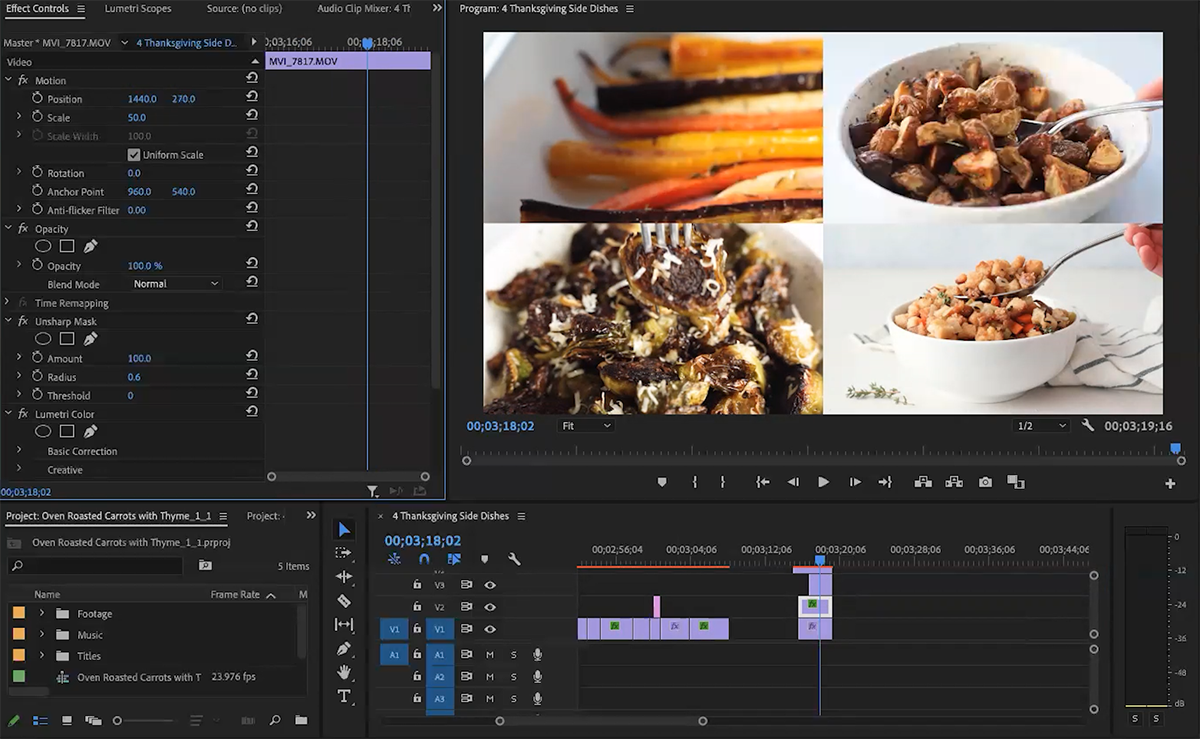
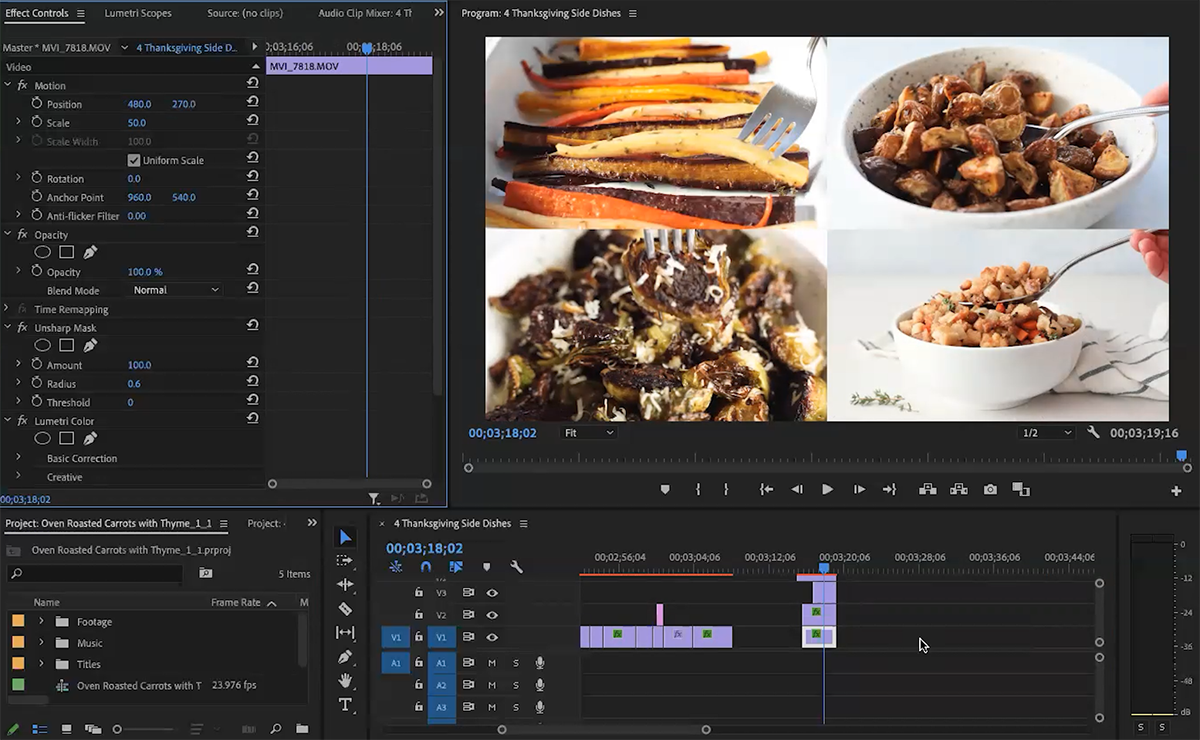
Once you have all four videos stacked on top of each other, it’s time to make them visible in a split screen. To do that, head to the effects panel.
Let’s start with V4, so make sure you have that specific clip selected in the timeline, then set the scale to 50%. Set the position to 1440 and 810.
For V3, again set the scale to 50% and the position to 480 and 810.
V2 will be 50% with the position of 1440 and 270.
V1 will be 50% at 480 and 270.
Now we have all four videos neatly set in their own space, but I need to straighten them out a little bit so they take up an equal amount of time in the timeline.
To get them to match up the way I want, I’m going to start by using the rate stretch tool (R on the keyboard). Some of the clips I had already sped up for their individual videos, so it’s easy to be able to stretch them out and slow them down to a more natural pace. I do not recommend taking the speed below 100% unless you’ve shot at 60 frames per second (chances are you’re shooting at 24 or 30).
As I looked through my split screen, I felt like the fork on the top left was a little out of place. I would prefer to see it coming from the left side of the screen.
To fix this, I need to go into the effects panel and search for Horizontal Flip. Drag that onto the clip and it will face the other direction.
How to create a border in a split screen
If you prefer a little space between the videos, there are a couple ways you could do it. You could scale the videos down more and position them to where you want them. If you want it to show white as the border, just create a blank legacy title with a white background to set as your V1 beneath all of your clips.
You could also create an image of two lines in photoshop, placing them mathematically in the center of your 1920 x 1080 video.
How to create a square split screen in Premiere Pro
If you were to change your sequence to a 1080 x 1080 square, you would see that it’s impossible to fit our video clips in the 4 way split screen neatly into the square the way we want.
To get around this, create another new sequence in your 4 way project, name it Square Exports, and copy and paste your four clips into it. Drop all the clips down onto V1 and change the sequence settings to 1080 x 1080 if they aren’t already.
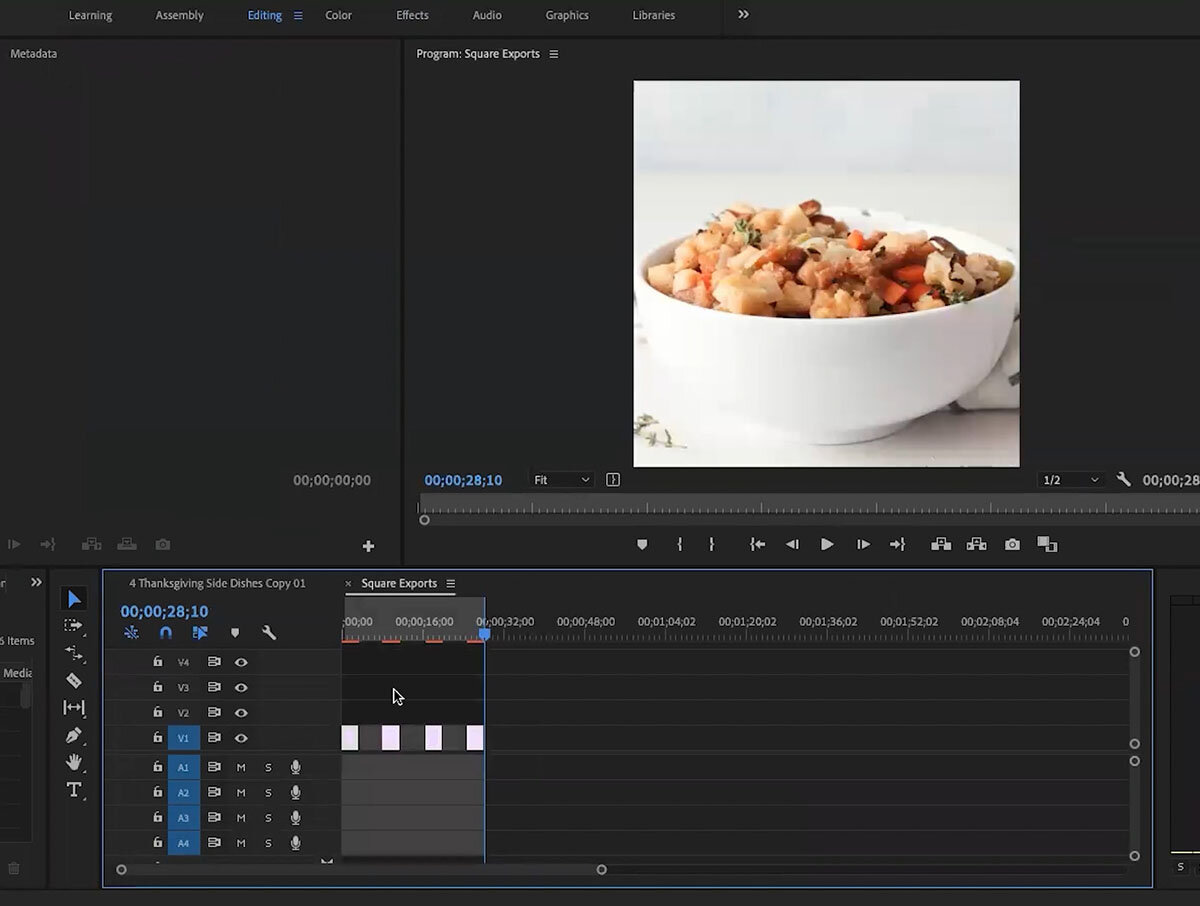
You may need to adjust the position of your clips so they display nicely in the square format. Once you have them all the way you want them, export this sequence, then import that video back into your project.
You can now open this square video in your source monitor, set in and out points for each individual clip, and arrange them in your square 4 way sequence the way you did in the 16:9.

You can easily set the positioning of each clip by pasting the attributes from the 16:9 sequence. To do this, click on a clip in the 16:9 sequence in the timeline, press COMMAND + C (or go to File —> Copy), then find the same clip in the square version, click on it, and press COMMAND + V (or go to File —> Paste). Repeat with the remaining three clips.
How to make 4 way videos quickly
You can save your 4 way project as a template to use for future videos. If you want to create another 4 way video, simply make a copy of your template and work in that, or open the template in addition to your project so you can copy and paste the settings for the split screen video.
It won’t matter if you don’t have the media files available in your template project since you’ll just be copying and pasting the settings attributed to them, not the actual clips themselves.
How to create other types of split screens
You can use this concept to create any kind of split screen you like such as a 2 way, 6 way, etc. To figure out the positions and size of clips needed, you’ll need to take the size of your sequence and divide by the number of clips you want to show. For example, I divided 1920 and 1080 by 4 (because my sequence was 1920 x 1080) and used increments of those numbers to find the position.
If you’re struggling to position your video in a different kind of split screen, remember that you may need to pull it into a sequence set at the same dimensions as you’ll be using it in, export, and then pull it back into your project.
Templates from Premiere Gal
I also wanted to make you aware of this free split screen template by Premiere Gal. She’s another great YouTube creator with lots of tips for working in Premiere Pro, so make sure you check her out.
The download is free and she has a tutorial on her page about how to use it. It is a little more complicated than just creating the split screen yourself, but she has a lot of really fun options for different types of split screens that might be too difficult to create on your own.
I’d love to see any split screen videos you create after this tutorial. You’re welcome to join my Facebook group where you can share what you’re working on every Monday and Friday as well as ask questions and get to know others working on learning video editing just like you.
As always, let me know if you have any questions!
