How to Edit Recipe Videos in Premiere Pro
Learn how to edit a recipe video from start to finish! I’m walking you through everything from creating a rough cut, to color correcting, to changing the size for sharing on different platforms. Watch the video below or keep reading to learn how.
This post contains affiliate links. If you click on a link and make a purchase, I receive a portion of the sale. All opinions are my own.
I’m really excited for this post because I’ve been working on building up to it for a long time. I’m going to show you how I edit a recipe video from start to finish!
I personally love seeing other peoples’ processes, so I hope you can take something from this to help you in your own. This is just how I edit a recipe video, you might do it totally differently and that’s ok!
I definitely recommend watching the video on this one. If you’d like to jump over to YouTube I’ve linked timestamps in the description box so you can easily find any section that might interest you.
Starting a new project
Most of my projects start in a template project. You can read more about how to set up a template project, but if you don’t have one, simply create a new project by going to File —> New —> Project.
Using bins

I like to create bins to keep my project organized, and I’m color coding the footage bins to help differentiate the overhead footage from the side angle.
To import footage, click on one of the footage bins, then press COMMAND + I to import the footage into that bin.

You can also color code the footage to match the color of the bin to help keep things organized.

Save the project
At this point, go to File —> Save As to save the project under a new name and preserve your template project for next time.
Creating a rough cut
We’re now going to start creating a rough cut from our footage. I create my first edit in a 16:9 sequence. Double click on a clip in the footage bin to bring it into the source monitor, then use the J, K, and L keys on your keyboard to shuttle back and forth through the footage.
If you’d like to learn more about saving time in editing, be sure to check out my tutorial on using quick keys.

To get a more precise in and out point, use the arrow keys to move left or right by one frame, then set your in and out by pressing I and O on the keyboard. Make sure your playhead is at the beginning of the timeline inside your sequence and you can use the period key (.) to drop the marked clip into the timeline.
What if I have audio I don’t want to use?
I did not record audio with this video, but if you did and didn’t want to use it you could lock the A1 layer to keep it from dropping the audio in, mute the track, or drag only the video over to the timeline by grabbing the little film strip in the source monitor.
As I edit through my footage, I have found that I prefer not to let any clip be longer than 2 seconds. That’s about as long as an attention span can watch any individual recipe step before it becomes tedious.
If you’re creating recipe videos where it’s important for the viewer to get all of the information for every step of the recipe this would be an exception. However, you can still show all steps of a recipe by selecting important clips from each step, or changing the speed of the clip to fit a shorter amount of time.

As I was editing this video I decided I didn’t want to show the spoon coming out of the pan, so I used the Slip Tool to adjust the portion of the clip to include just stirring.
Adding a second camera angle
After getting all the overhead camera footage laid out, I’m going to go through and add the footage I took from a side angle. I like to use this to keep the pace of the video going and enhance what we’re seeing in the overhead footage, so we’ll only need a few clips here and there.
Finally I’ll select a hero shot, which I will put at both the beginning and the end of the video.
This happened to be a very short recipe so it didn’t take long to edit it down. If you were working with a longer recipe that required some more finesse to fit it under one minute, I recommend choosing short clips and using the Rate Stretch Tool to fit everything in.
Color correcting in Premiere Pro
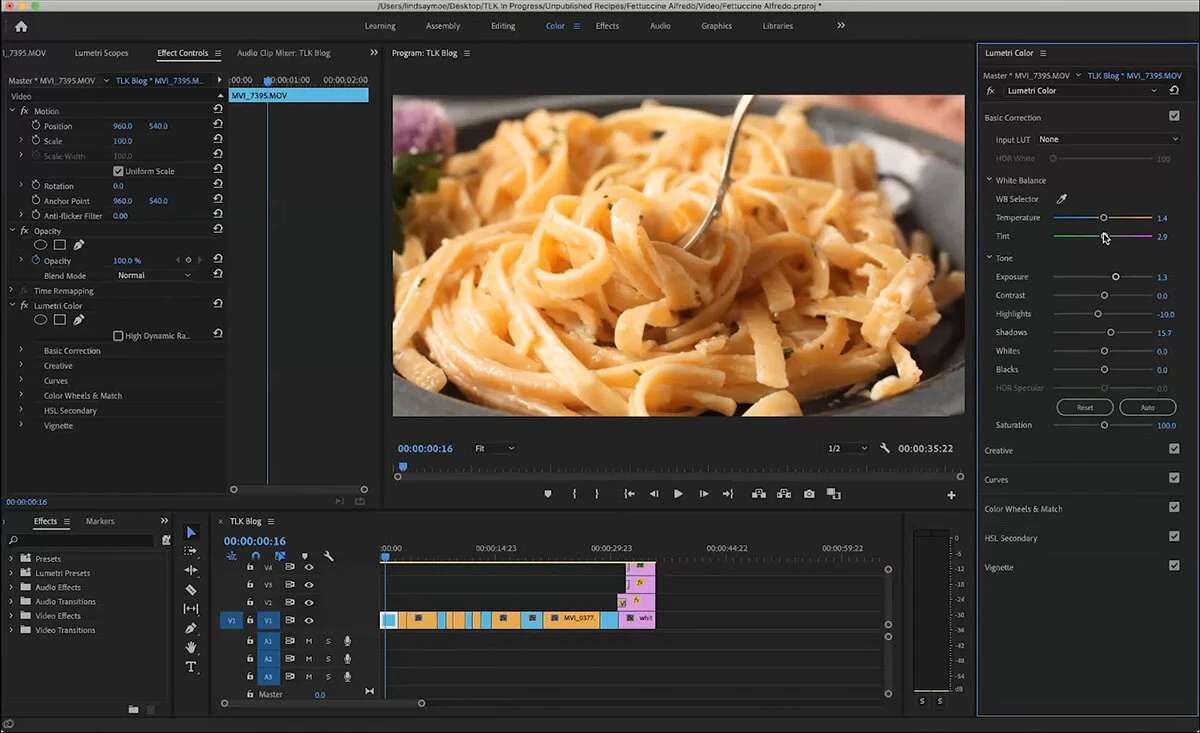
Next we’ll move on to color correction. I have another post all about how I color correct, but basically you want to balance it out so it looks natural and brighten any clips as necessary.
I find the light where you’re editing can make a big difference in how your eyes process color, so I recommend making some changes and coming back to double check it before you’re done.
I’m also working on a more advanced color correction tutorial that doesn’t require you to rely on your eyes, so I’ll come back and link that to this post once it’s live.
Once I have a clip fully corrected I can click on it and use the keyboard to hit COMMAND + C, then click on another clip and press OPTION + COMMAND + V to paste the color correction settings onto that clip.

Rotating clips
I also like to rotate my overhead footage so that my hands are coming from the bottom of the frame. You can do this in the effects panel under motion effects. Change the rotation to 180º.

Rendering
If you’re working on an older or low power computer, you may need to render your footage in order to get it to play back. To do this, highlight the clips you want to render or set an in and out point, then to go the Sequence menu and select one of the rendering options.
Since purchasing a 2017 MacBook Pro (<— affiliate link to one similar to mine) I no longer need to render, Premiere is able to keep up and show me my footage even after applying effects.
Adding titles
Next we’re going to add titles to our video. I have most of the titles I need already set up as legacy titles in my template project with the font and size that I’ll be using. If you’d like more information on how to create titles and whether you should be using the graphics panel or the legacy title tool for recipe videos, you can visit my blog post on the two ways to create titles in Premiere Pro.

To create a new title for the name of the recipe I’ll go to File —> New —> Legacy Title. I already have a style saved for my recipe titles, but you can type in your text, highlight it, and adjust the font, size, and position as needed.
Adding music
The final step is to add music. I imported a music clip into my music bin by pressing COMMAND + I.

From there you can drag the clip from the project panel to A1 in the timeline (or wherever you want to put it). Enable the cut tool, or grab the end of the music clip and make it the same length as the video.
I always add a Constant Power effect to the end to help ease it out and prevent popping. There are other ways to do this, and you can check out my post on how to adjust audio levels for more information.

Finishing up
Now we’ll go through and watch the video from start to finish to check for mistakes or anything we might want to change.
Once I’ve made any necessary changes, I’ll put the playhead out past the end of my video and press the up arrow, left arrow, and O to set the out point.
Creating different sizes for the same video
I will also click and drag to highlight all the clips in my timeline, copy, and paste them into the square template. Make sure to scrub through the square sequence to make sure all your titles fit and the video is centered within the square.
If you need to adjust the position of a clip to center it in the square, go to the Effects panel and move the numbers next to Position until it’s where you want it to be.
For the Instagram version of my videos, I like to add a photo as the first frame of the video to make it look more cohesive with my feed.
After importing the photo into one of your bins, drag it over onto it’s own track in the timeline. Change the duration to 1 frame, then adjust it in the Effects Panel until it is showing to your liking.
Exporting
After setting out points for all your sequences, you can click once on them and use COMMAND + M (or File —> Export) to add the videos to the queue in Media Encoder.

Over in Media Encoder, drag the preset for YouTube 1080p (or whatever you shot in) into the preset for each video. If you video is a different size than 16:9, double click on it after dragging onto the preset and change the size to match the size of your video.
Once you’re ready, press the PLAY button in Media Encoder to begin encoding.
Creating a tall video pin
After you’re done encoding, import one of the square videos into Premiere. We’re going to use this to create a tall video pin.

I’m essentially going to stack the square video on top of an image, then set an out point and encode this video as well. If you’d like more information on this topic you can read my post about how to create video pins.
That’s it! That’s how I edit a recipe video from start to finish. I know it’s a lot, thanks for sticking in there!
Let me know if you have any questions, or head over to the Facebook Group to start a conversation there.